AccountRight Plus and Premier only
Once you've created payroll categories and an employee card, you can enter the employee’s payroll information. If you've sent an employee a self-onboarding request to submit their own details, find out how to finish setting them up by adding their payroll information.
When using Pay super and Single Touch Payroll reporting, there’s some mandatory information you need to enter in your employee cards.
Employee or contractor? To learn about the differences, check the ATO website.
Prevent access to employee information
You can set up user accounts to ensure only those users you choose have access to employee payroll information.
To enter payroll information
Go to the Card File command centre and click Cards List.
Click the Employee tab and then click the zoom arrow next to the employee card you want to enter details for. The Card Information window appears.
Click the Payroll Details tab. This window is divided into a number of subsections.
Click a tab on the left of the window to enter payroll details.
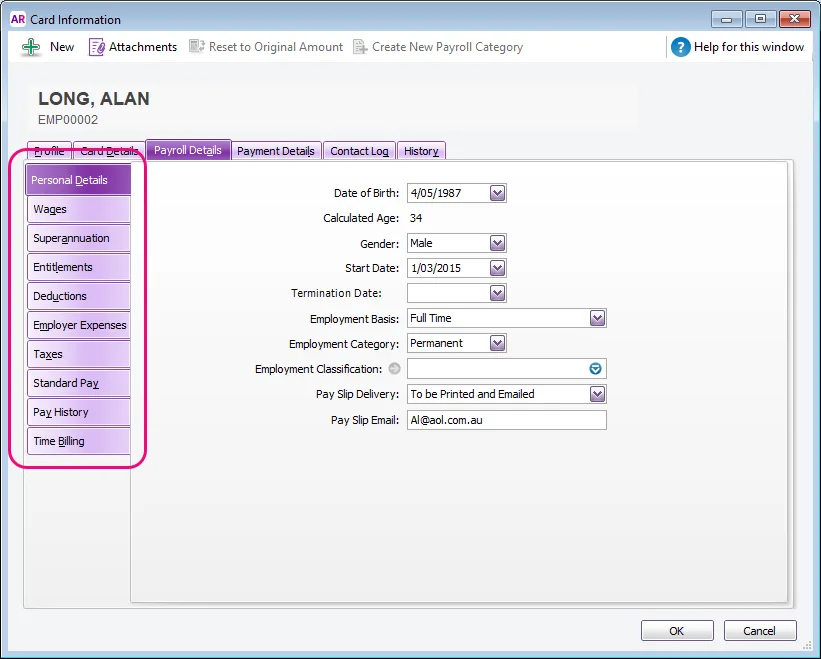
The sections below step you through each of these tabs.\
Click Attachments at the top of the employee's card to attach documents to their card, like an employment agreement. Learn more about Attaching documents to your cards.
To enter personal information
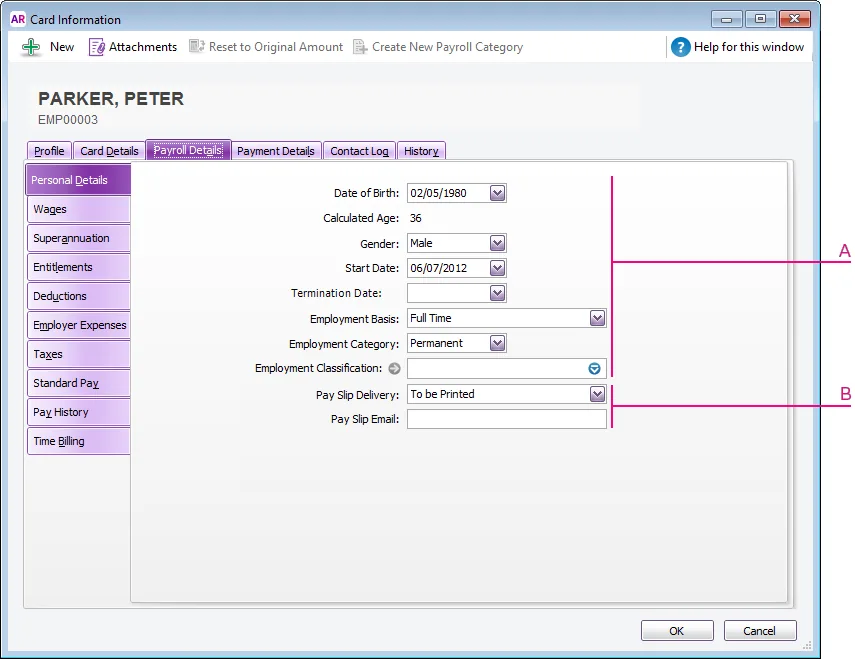
A – Enter personal details, such as Start Date, Employment Basis, Employment Category and Employment Classification (see note below).
The Employment Basis is the employee's working basis, for example full time, part time, casual, etc. If this is set to Other, information will not be reported to the ATO for Single Touch Payroll
B – Select how you will deliver the employee’s pay slip. If you select email, enter the employee’s email address in the Pay Slip Email field. The employee's email address can also be recorded on the Profile tab of their employee card, but the Pay Slip Email field on the Payroll Details tab controls where their pay slips are emailed.
Employment Classifications
Employment Classifications in AccountRight are a means to classify your employees. For example, you might want to assign a specific classification to workers who are employed under a specific award or agreement.
Primarily this field is used as an additional filter for reporting purposes. By default, it will also display on the employee's pay slip (which you can personalise). It serves no other purpose in the setup of an employee's card.
AccountRight comes with a default list of Employment Classifications, but you can customise this list to suit your business (Lists menu > Employment Classifications).
To enter wage information
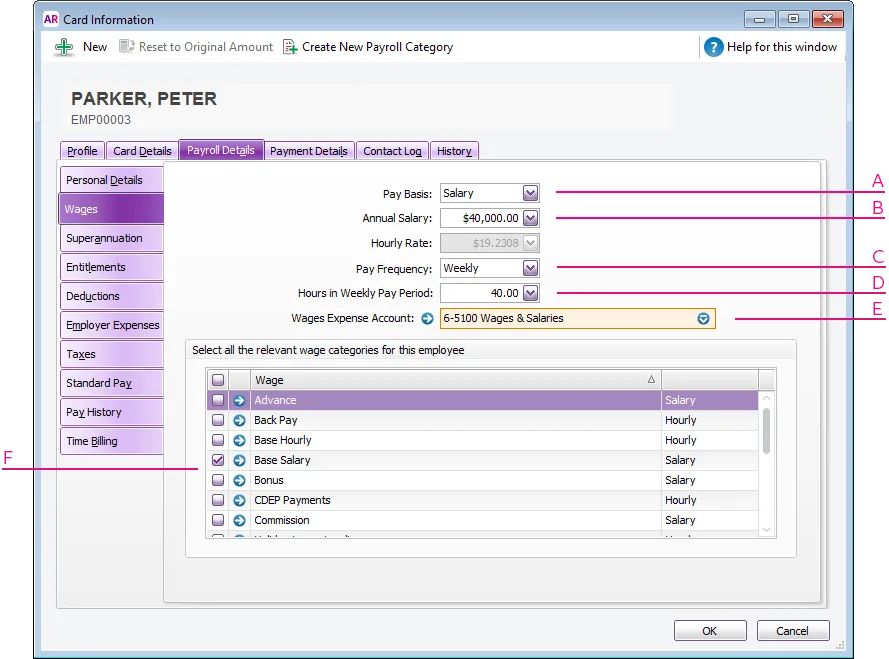
A – Select the employee’s pay basis. When you select a pay basis, the corresponding payroll category for paying wage amounts is automatically selected in the Wage list. If you select Hourly, the Base Hourly wage category (or the name you assigned to this category) is selected. If you select Salary, the Base Salary wage category (or the name you assigned to this category) is selected.
B – Enter the employee’s annual salary or hourly wage rate.
If the Pay Basis is Hourly, enter the Hourly Rate.
If the Pay Basis is Salary, the Hourly Rate is calculated based on the Annual Salary, Pay Frequency and Hours in XX Pay Period.
C – Select the employee’s pay frequency (Weekly, Fortnightly, Twice a Month, Monthly, or Quarterly). When you process a pay run, you can pay individual employees or all those with the same pay frequency.
D – In the Hours in [...] Pay Period field, type the number of hours in the employee’s pay period. By default, this will be based on the hours entered in the General Payroll Information window (Setup menu > General Payroll Information).
E – If the employee’s wage expense account is different from the default account, in the Wages Expense Account field, type or select the required account.
F – Click in the select column () next to each wage category that applies to the employee. Learn more about wage categories.
Multiple hourly pay rates
Only one Hourly Rate can be set on the Wages tab of an employee's card (see "B" in the table above). If you pay employees different rates for different tasks, set up multiple wage categories and assign these to your employees (see "F" in the table above). Other pay rates, like overtime, are handled in a similar way.
When paying employees, you can record hours against the applicable wage categories. In this example we're paying an employee 20 hours on base rate 1, and 18 hours on base rate 2.
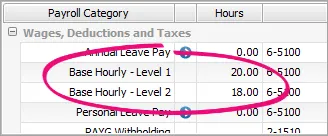
Learn more about entering or changing hours in a pay.
To enter superannuation information
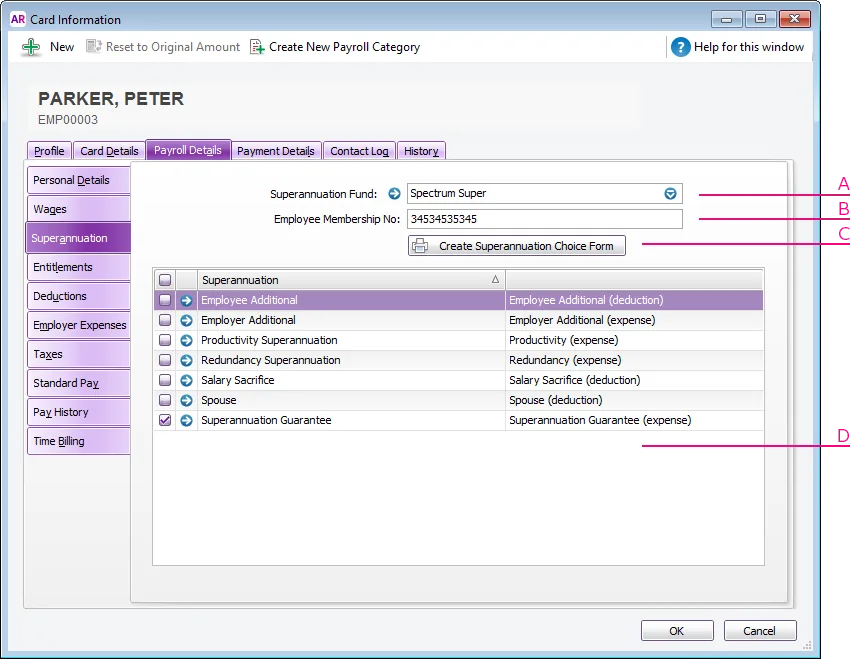
A | In the Superannuation Fund field, enter your employee’s nominated fund. This is mandatory if you’re using Pay Super. If your employee’s superannuation fund does not appear on the list, you need to create it. |
B | Enter the employee’s fund membership number in the Employee Membership No. field. This is mandatory if you’re using Pay Super. If the employee doesn't have a membership number, contact their nominated super fund who will advise what to enter here. |
C | If you need to provide a Standard Choice Form to this employee: Click
Create Superannuation Choice Form . The
Review Employees Before Exporting
window appears. Click
Mail Merge . A Standard Choice Form appears for the employee as a Word document. Save or print the form. Click
Cancel . The
Card Information
window reappears. |
D | Click in the select column () next to each superannuation category that applies to the employee. For example, if the employee is eligible for super guarantee contributions, you could select the Superannuation Guarantee payroll category for the employee. |
Learn more about superannuation.
Need to edit a super fund? Go to the Lists menu > Superannuation Funds > click the zoom arrow for the fund you want to edit.
To enter entitlement, deduction and expense information
Click Entitlements and click in the select column () next to each entitlement that applies to the employee.
Click Deductions and click in the select column () next to each deduction that applies to the employee.
Click Employer Expenses and click in the select column () next to each expense that applies to the employee.
If the employee has entitlement hours owing to them, enter the opening balances in their card. Click Entitlements and enter the opening balances (in hours) in the Balance Adjustment column.
Learn more about entitlements, deductions and employer expenses.
To enter tax information
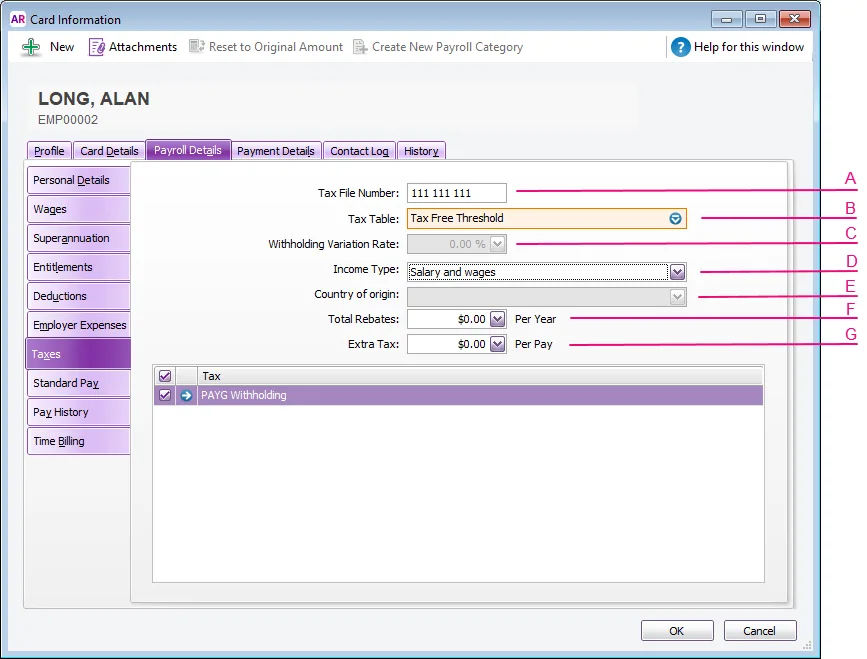
A | Type the employee’s tax file number in the Tax File Number field. You'll be alerted if an invalid number is entered (AccountRight 2017.2 and later). If you have employees who don't have a Tax File Number, use one of these numbers provided by the Australian Tax Office: 111 111 111: New payee has not made a TFN Declaration, but 28 days have not passed 333 333 333: Payee is under 18 years of age and earnings don't exceed $350 per week, $700 per fortnight, or $1,517 per month. 444 444 444: Payee is an Australian Government pensioner payee. 000 000 000: Payee chooses not to quote a TFN and has not claimed an exemption from quoting a TFN or does not fit into any of the above categories. |
B | Select the employee’s tax table from the Tax Table list. For clarification on the different tax tables, and for help determining which tax table to assign to an employee, check with the ATO. |
C | If you select Withholding Variation from the Tax Table list, type the variation rate in the Withholding Variation Rate field. |
D | Choose the employee's Income Type. This is required by the ATO for Single Touch Payroll. |
E | If the employee's Income Type is Working holiday maker, choose their Country of origin. |
F | If the employee is claiming a tax rebate, type the total amount in the Total Rebates field. Amounts entered in this field reduce the tax payable over the year in instalments based on the employee’s pay frequency. For example, if the employee is paid monthly, 1/12th of the rebate is applied to each pay. |
G | If the employee requests additional tax to be withheld from their pay, type the amount to be withheld each pay period in the Extra Tax field. |
Tax File Number Declaration form
With Single Touch Payroll Phase 2, a new employee's tax details will be sent to the ATO when you declare their first pay run from AccountRight, so you won't need to submit a TFN declaration.
Learn more about taxes.
To enter standard pay information
The default values in this window are determined by the payroll categories selected and wage information entered.
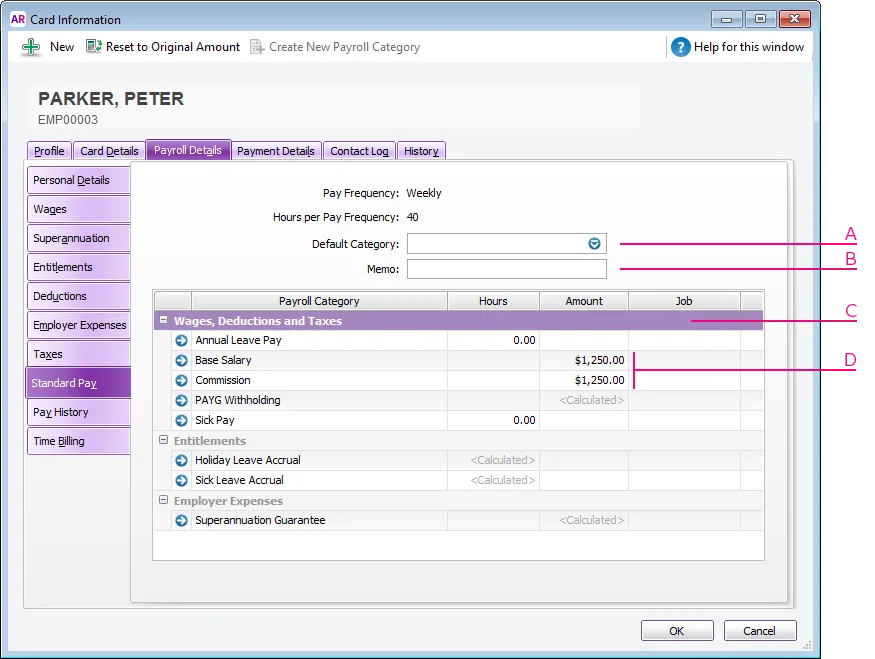
A | [Optional] If you track financial information using categories, select a category from the list. |
B | [Optional] You can enter a default Memo to appear on the employee's pay slips. You'll need to add the Memo data field to your pay slip form to ensure the memo displays. You can override this memo when processing the employee's pay. |
C | [Optional] If you want to assign a job number to a payroll category for this employee, click in the Job column and enter or select a job number. If you need to assign more than one job, do it during the pay run. |
D | If necessary, change the employee’s default pay details by overriding the values that appear in the Hours or Amount column next to a payroll category.If you use timesheets to record all hours worked by an employee, enter zero as the default hours for the Base Hourly payroll category. Payroll categories with a calculated value The value of a payroll category with Calculated displayed in the Hours or Amount column is calculated when you process a pay. For example, tax amounts and entitlement hours where hours are calculated as a percentage of the gross hours paid. |
Learn more about standard pay details.
To enter pay history and time billing information
If you started processing payroll part-way through the payroll year, click Pay History and type the amounts paid prior to the first recorded pay in the Activity column. You can enter pay history for specific months, quarters or for the year to date.
For deductions, enter the amounts as negative values.
Amounts entered in the Pay History window will ensure the employee's year-to-date totals are correct when payroll information is sent to the ATO for Single Touch Payroll reporting.
If the employee has entitlement hours owing to them, enter the opening balances in their card. Click Entitlements and enter the opening balances (in hours) in the Balance Adjustment column.
If the employee has accrued superannuation which has yet to be submitted to their fund (using Pay Super), don't enter it in their pay history. Instead, record a pay for $0 that only includes the accrued super (do this after recording all other pays for the month). For more details, see Checking and adjusting superannuation.
If you use the Time Billing function to track time the employee spends to complete work for clients and customers, click Time Billing and enter the employee’s time billing rate and cost per hour.
To enter payment details information
You can pay an employee using cash, cheque or electronically.
If you pay the employee electronically (using a bank file or paying directly from AccountRight), enter their bank account details. You can also split an employee's pay across up to three accounts.
If you pay the employee by manually transferring funds into their bank account (not via a bank file or direct payments from AccountRight), set their Payment Method to Cash.
Click the Payment Details tab and select the method you use to pay the employee in the Payment Method field.
If you selected Electronic:
Select the number of bank accounts (up to three) the employee wants their pay to be distributed to.
Enter the employee’s bank details for each account. If the employee's bank account number is 10 numbers long, see the FAQ below.
Enter the statement text (Account 1 only) you want to appear on the employee’s bank statements.
If you are distributing to more than one account, in the Value field, type the amount or percentage of the pay to be deposited into the account and select the distribution method (Percent or Dollars) from the list. Note that the final account will receive the remaining amount of your employee’s net pay.
Click OK. The Cards List window reappears.
Click Close to return to the Card File command centre.
10 digit bank account numbers
In most cases where a bank account number is 10 digits long, the first character is a zero and this can be omitted in AccountRight. However we recommend you check this with your bank first to ensure it's OK to do this in your situation.
Learn more about electronic payments.
Recording additional information
If you have employee-specific information that you want to record which isn't catered for in AccountRight, such as next-of-kin or emergency contact details, use the Notes field on the Card Details tab of the employee's card.
Alternatively, you can set up a custom list of attributes which might apply to your employees, or create a custom field.