Unlike reviewing a tax return, sending a tax notice for review is optional.
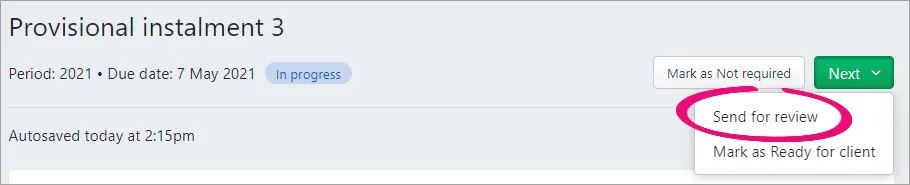
If you choose to send a tax notice for review, the Send for review option updates the status of the tax notice to In review. If you want someone else in your practice to review the tax notice before you send it to your client, they can approve it and the status of the tax notice updates to Ready for client.
If your practice regularly reviews each other's work, this will help you keep track of whether it's ready to send to your client.
If you're a sole trader or will review the tax notice yourself, you can skip this step by clicking Next and selecting Mark as Ready for client.
When you're reviewing a tax notice, you can
Add comments to it
export the information to a spreadsheet
These are optional steps when reviewing, but can be a useful way of keeping track of your work before sending it to your client.
Add, view or delete comments on a tax notice
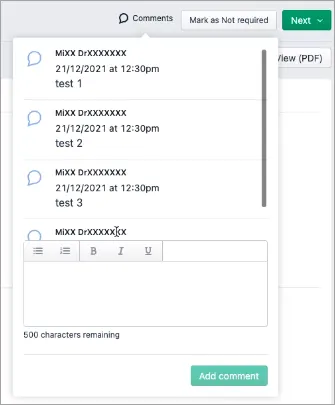
You can add comments about tax notices for other users to view. For example, if you want to leave a message to let others in your practice know that a tax notice may not be necessary for a particular reason.
You can view and add comments:
on the Tax notices page, from the overview list of all tax notices
by opening an individual tax notice.
You can also view all comments by exporting the Tax notices data to a spreadsheet (see below).
An icon indicates whether a tax notice has any comments:
Tax notice with no comments: a speech bubble outlined in purple.
Tax notice with comments: a solid purple speech bubble.
If you’re on the Tax notices page, the icon will be in the Comment column. If you’ve opened the tax notice, the icon will be on the top right of the page.
Information about the time, date and author of the comment is included with each comment. You can also add text formatting. There’s no limit to the number of comments you can add to a tax notice.
Adding a comment:
Open the Tax notices page and, optionally, open a tax notice from the list.
Click the comment icon.
The solid purple speech bubble or speech bubble outlined in purple.If you’re on the Tax notices page, the icon will be in the Comment column. If you’ve opened the tax notice, the icon will be on the top right of the page.
The comment window appears.

Enter your comment in the text field.
Don’t click out of the comment window before you’re finished making your changes. If you click out of the comment window, the window closes without saving the content.
You can use the toolbar above the text field to add formatting. The amount of characters remaining for your comment is displayed below the text field.
Click Add comment.

Viewing and deleting a comment:
To view a comment:
Open the Tax notices page and, optionally, open a tax notice from the list.
Click the icon indicating a tax notice with comments (the solid purple speech bubble).
If you’re on the Tax notices page, the icon will be in the Comment column. If you’ve opened the tax notice, the icon will be on the top right of the page.
All the comments that have been added to the tax notice are listed.
To delete a comment:
Hover over the comment. An ellipsis appears to the right of the comment.

Click the ellipsis. A Delete option appears.

Click Delete.


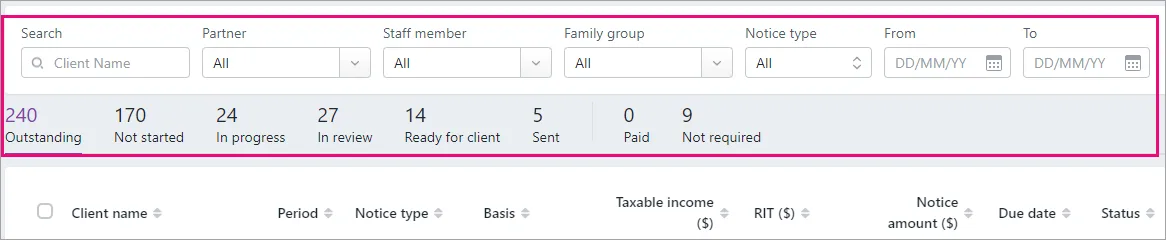
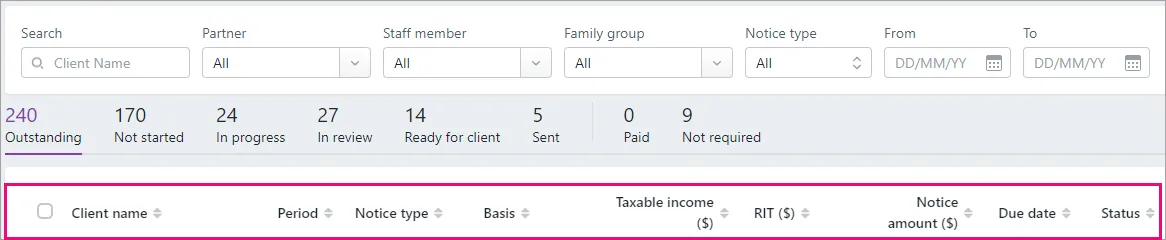
Export Tax notices data to a spreadsheet
To help with reviewing work, you may find it helpful to export data to an XLSX file. This lets you open it in Microsoft Excel, which can be a handy way to make and share notes and comments while reviewing. The export displays the Tax notices page columns as they appear in MYOB Practice and other information such as the IRD number and data relating to tax pooling, provisional tax options, voluntary adjustments, assessment amounts and adjustments.
Filters
You can customise the data by changing the sort order or by applying a filter before exporting. Customising in this way lets you, for example, create a different export for each partner that contains only the data that is most relevant for each partner to review.
Filters change the data in the columns, but the values from the filters aren't displayed in the export. For example, you can filter the data for partners, but the values inside the Partner filter won't display in the export.
You may also notice some differences in how the data is displayed in MYOB Practice compared to Excel. For example, the Period year in MYOB Practice is displayed as two Period start and Period end columns.
The user who is logged in to MYOB Practice and who exports the data will be displayed as the author in the XLSX file's properties.
Disclaimer
The data you’re exporting may include an individual's personal information. You should take steps to keep that information secure.
Open the Tax notices page in either the client-centric or All clients view.
Optionally, customise the data that you'll export:
To narrow down the data to export, apply a filter from the top of the list or click a status tab.
To change the sort order, click a column header.
On the top right of the page, click Export (XLSX).
The XLSX file is downloaded to your browser's download location, using the file name format YYYY-MM-DD_MYOB_TaxNoticeList.xlsx.


Request an internal review
In the Provisional tax notice or Terminal tax notice page, click Next and choose Send for Review.
If someone else will be reviewing the tax notice, let them know that it's ready for their review.

Review and approve the tax notice
Open the Provisional tax notice or Terminal tax notice you want to review, and check the data.
If you're happy with the tax notice and it's ready to send to your client, click Approve. The tax notice status changes to Ready for client review and the Send to client button appears.
Approving a tax notice will lock it so that no further changes can be made.
If further changes are required, click Send for Rework to update the status of the tax notice back to In progress.

