Payday Super is coming 1 July 2026 - find out how to get ready and stay compliant.
You'll do a pay run whenever you want to pay your employees – usually at a set frequency (pay cycle) like weekly, fortnightly or monthly.
Before your first pay run
-
Set up payroll to make payday a breeze and be ATO compliant
-
Set up your employees to record who they are and what you pay them
-
Set up electronic payments for quick, secure wage payments into your employees' bank accounts
When you do a pay run, you're guided through each step so nothing gets missed. Your employees' regular pay amounts will be included, but you can easily make changes, like adding leave or adjusting hours.
Payroll at a glance
Here are the basic steps for paying your employees (Create menu > Pay run).

Select pay period to choose who you're paying and the dates they're being paid for.
Calculate pays to make changes or additions, like leave or adjusted hours.
Record and report to confirm who and what you're about to pay, and declare the pay to the ATO.
Prepare pay slips to email or print for your employees.
Done! Finish the job by paying your employees into their bank accounts.
A pay run in detail
Start a new pay run via the Create menu > Pay run.
1. Select pay period

Choose the Pay cycle for the employees you want to pay. This will be remembered for the next pay run so you won't have to choose it every time. If the pay isn't part of a typical pay cycle, like a one-off bonus, choose Unscheduled. More about unscheduled pays.
Confirm the Pay period start and Pay period end dates.
Confirm the Date of payment.
This is the date you'll make the payments to your employees, and the payment date that shows on pay slips.
This date determines the financial year the pay falls into, regardless of the pay period. For example, if the date of payment is June 30 the entire pay falls into the June financial year.
If you enter a future date, the pay will be recorded in MYOB on the day you complete the pay run. If you pay employees using a bank (ABA) file, it's the date you want your bank to process the payments.
If you enter a past date, you'll need to choose how to report the pay for STP.
If any timesheets have been recorded for this pay period, they'll be listed and selected. Deselect any timesheets you don't want to include in this pay run.
If timesheets aren't showing, check the right pay cycle is chosen and if the timesheet hours have already been paid. How to check these things.
When you're done, click Next.
2. Calculate pays
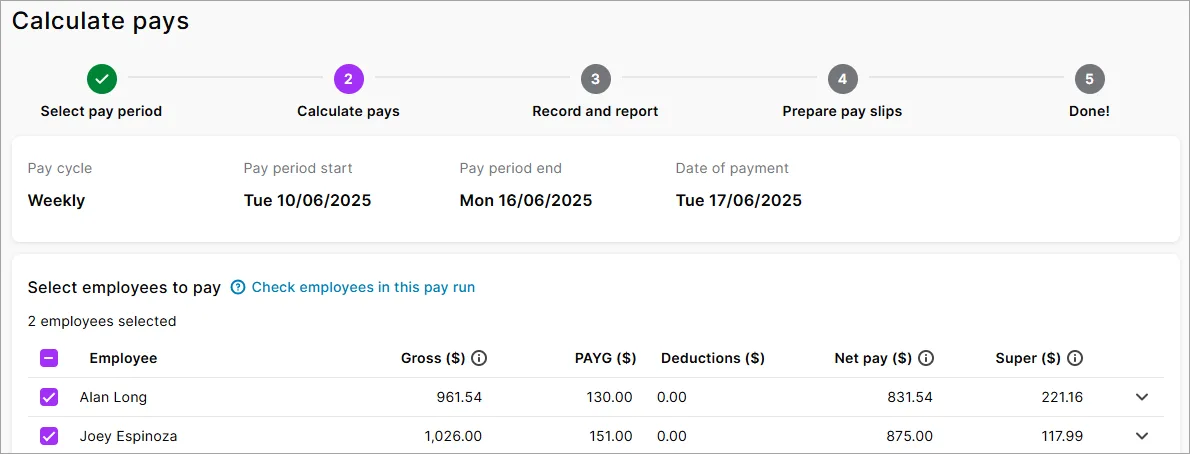
At the Calculate pays step of the pay run, you'll see the employees you're paying. To be included in the pay, an employee's pay cycle must match the one chosen at the previous step, e.g. Weekly. Check an employee's pay cycle in their record (Payroll > Employees > click the employee > Payroll details tab > Salary and wages tab > Pay cycle).
Deselect any employees you don't want to include in this pay.
Click an employee to see the details of their pay or make any changes.
Changing hours worked
You may need to change the hours worked by an employee if they're not being paid for a full standard pay period, for instance, if their work hours vary.
Changing the hours worked only affects this pay. If you need to permanently change an employee's regular hours, update it in their standard pay.
If you edit an employee’s hours during the pay run, any adjustments you make will not update hours entered on timesheets or timesheet reports.
At the Calculate pays step of the pay run, click the employee to expand their pay.
Change the hours worked for the applicable wage pay item. For example, enter a casual worker's actual hours worked against the Base Hourly pay item.
Click the employee again to collapse their pay.

Adding leave
If an employee has been set up for leave you'll be able to add the leave taken on their pay.
Leave without pay
If entering leave without pay, reduce the employee's normal hours by the number of hours of unpaid leave. Otherwise they'll be overpaid.Learn more about leave without pay.
At the Calculate pays step of the pay run, click the employee to expand their pay.
Enter the number of hours of leave against the applicable leave pay item. For example, enter annual leave hours against Annual Leave Pay.
If you've set up the leave pay item with the option Automatically adjust base hourly or base salary details selected, the employee's Base Salary or Base Hourly amount will be automatically reduced to cater for the leave payment. Otherwise you'll need to adjust this manually to avoid overpayment.
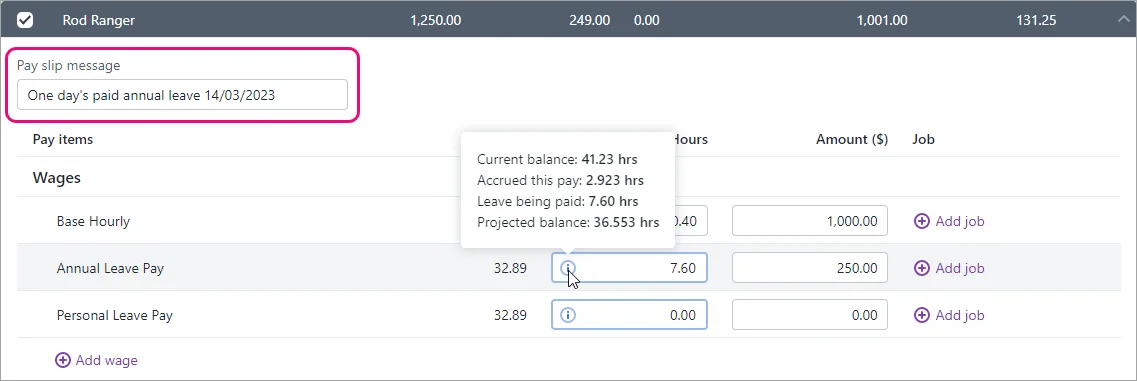
(Optional) Hover over the info icon in the leave hours field to see the employee's leave balance details.
(Optional) Use the Pay slip message field in the employee's pay to enter their leave dates. Here's our example showing 7.6 hours annual leave added to the pay with leave balance details shown.
Click the employee again to collapse their pay.
Negative leave balances
If an employee takes more leave than they've accrued, their leave balance will become negative. However, they'll still be paid for all the leave entered on the pay run.
Including other payments like overtime, allowances or deductions
Include additional payment types like overtime, allowances or deductions during the pay run. If the additional payment is the same amount each pay, automate the payment by adding it to the employee's standard pay.
If other types of payments have been included on a timesheet, you don't need to use this procedure.
At the Calculate pays step of the pay run, click the employee to expand their pay.
Enter the payment or deduction in the Hours or Amount fields next to the applicable pay item. For example, to pay 3 hours of overtime, enter 3 hours against the applicable overtime pay item.
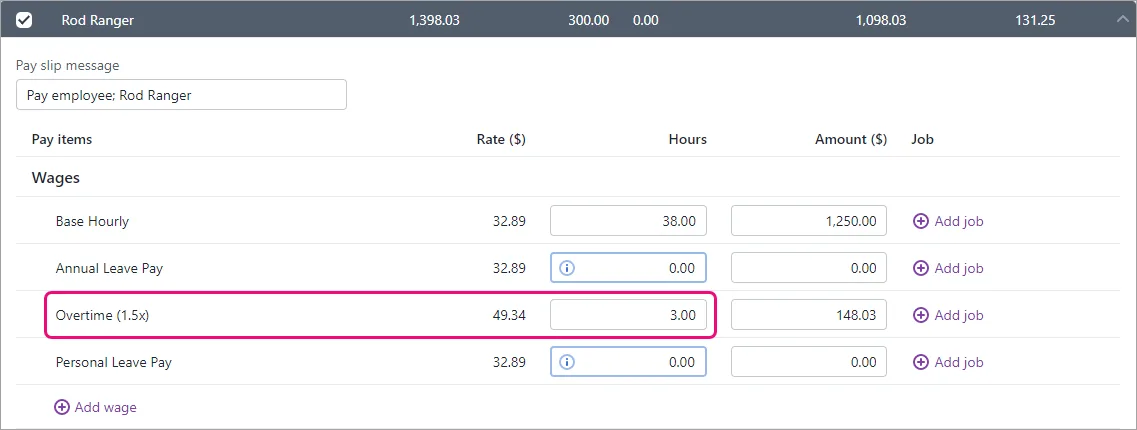
If the payment type isn't listed, click Add wage or Add deduction to add it. You can only add a pay item this way if there's already at least one of the same type of pay item in the pay. Otherwise, here's how to assign pay items to employees.
Click the employee again to collapse their pay.
The same approach can be used if a regular allowance or deduction amount changes or isn't required for a pay. Just change (or remove) the allowance or deduction Hours or Amount in the pay.
Assigning jobs to pay amounts
Jobs can be assigned to pay item amounts to track the wage expense of work performed on that job. You can assign one or more jobs to each pay item.
At the Calculate pays step of the pay run, click the employee to expand their pay.
Click Add job next to the corresponding pay item.
Select one or more jobs.
Add the amount to be allocated to each selected job.
Click Add.
Click the employee again to collapse their pay.

You can also assign a default job to an employee in their standard pay.
Adding a message to the pay slip
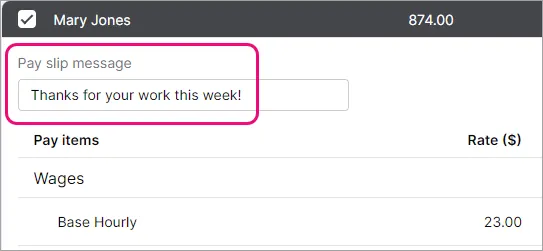
You can enter a default pay slip message in an employee's standard pay that'll appear on all pay slips for that employee. But you can update this message or enter a new one during the pay run, and it'll only appear on the pay slip for this pay.
At the Calculate pays step of the pay run, click the employee to expand their pay.
Enter or update the Pay slip message.
Click the employee again to collapse their pay.
When you're done, click Next.
3. Record and report
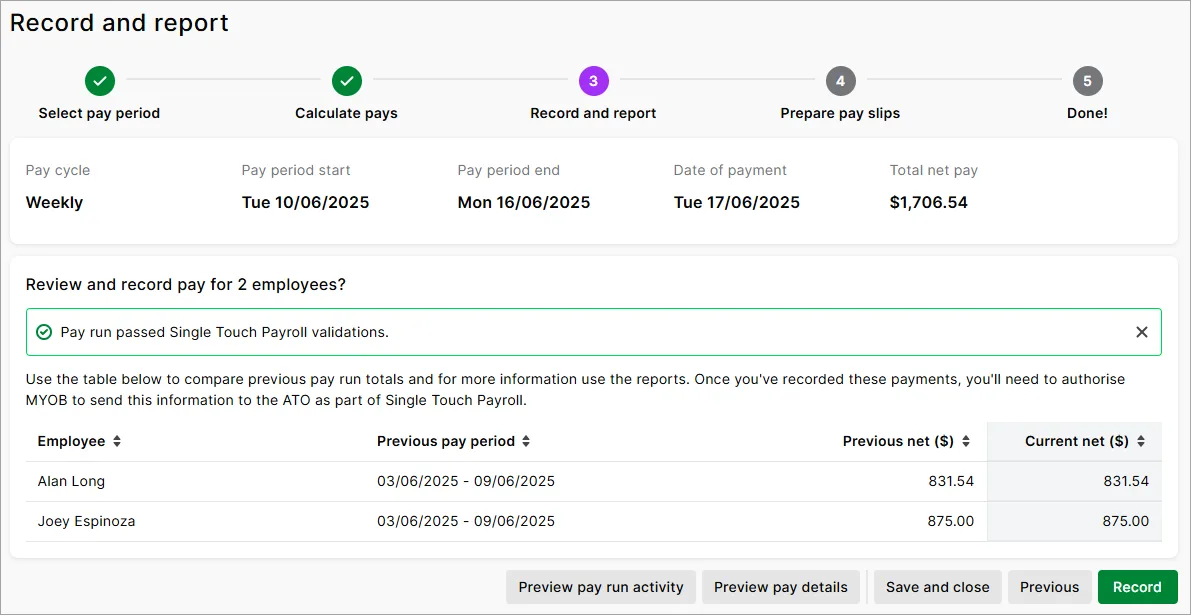
Review the pays you're about to record. Check the previous and current pay amounts to easily identify any variances.
To verify who you're paying and what you're paying them in this pay run, you can click to generate these reports:
Preview pay run activity – shows a detailed list of salary and wages, taxes, deductions, leave, and expenses for this pay run
Preview pay details – shows the Payroll verification report containing a summary of each employee's pay in this pay run
When you're ready, click Record.
When prompted to send payroll information to the ATO (for Single Touch Payroll reporting), enter the name of the authorised sender and click Send.
4. Prepare pay slips
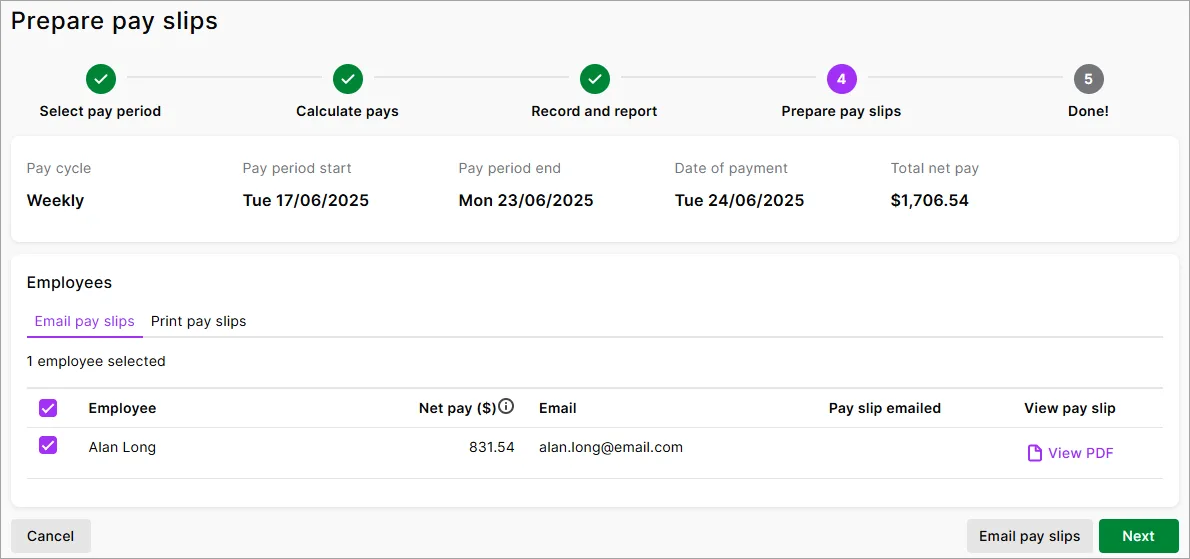
On the Email pay slips tab, select the employees requiring their pay slips to be emailed then click Email pay slips. Need to change an employee's pay slip delivery method?
On the Print pay slips tab, click View PDF for an employee to open the pay slip as a PDF in a new window. You can now save or print the pay slip.
When you're done, click Next.
5. Done!
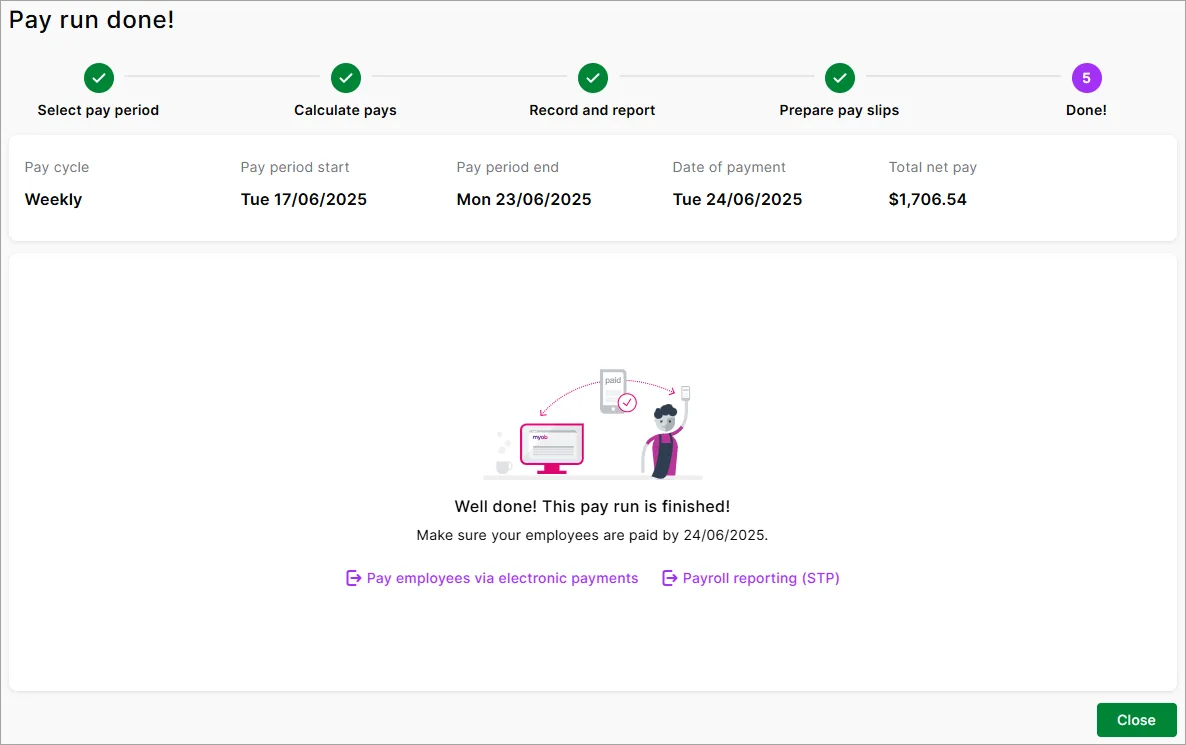
The pay run is recorded and you can now prepare to pay into your employees' bank accounts by clicking Pay employees via electronic payments.
To view your Single Touch Payroll reports to make sure they've been accepted by the ATO, click Payroll reporting (STP). Help me fix a rejected STP report.
Managing payroll, reporting and super
Here are some other key tasks to help manage your payroll.
Check your STP reports
Make sure the ATO accept the reports you send them after each pay. View STP reports
Make super payments
Send payments to your employees' super funds at least quarterly. Make super payments
Adjust a pay
You can fix most pay issues in the next pay run or a separate pay. Fix a pay
Review payroll reports
All your payroll info at a glance, including paid and accrued leave and super. Review payroll reports
AccountRight Plus and Premier only
You'll do a pay run whenever you want to pay your employees – usually at a set frequency like weekly, fortnightly or monthly.
Before your first pay run
-
Set up payroll to make payday a breeze and be ATO compliant
-
Set up your employees to record who they are and what you pay them
-
Set up electronic payments for quick, secure wage payments into your employees' bank accounts
When you do a pay run, you're guided through each step so nothing gets missed. Your employees' regular pay amounts will be included, but you can easily make changes, like adding leave or adjusting hours.
Payroll at a glance
Here are the basic steps for paying your employees (Payroll command centre > Process Payroll).
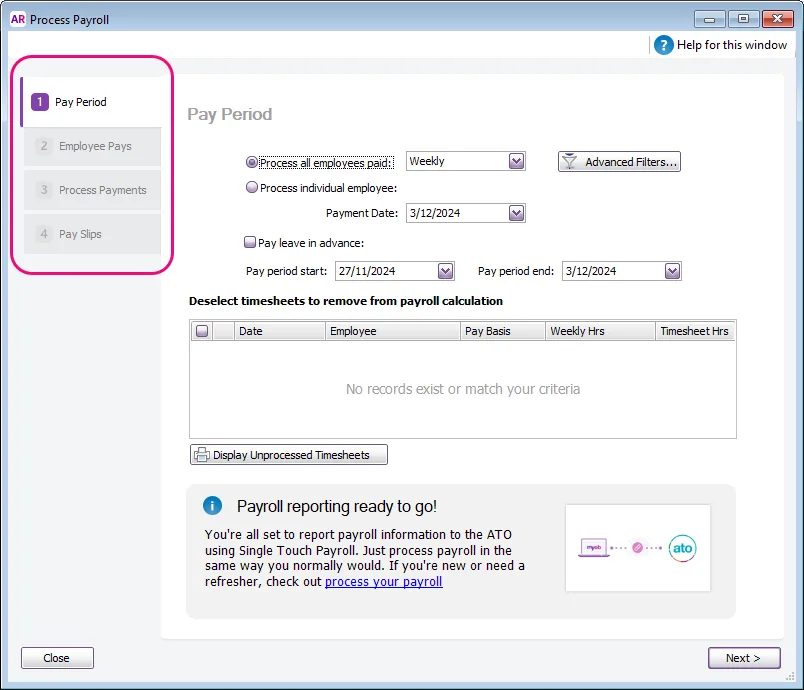
Pay Period – choose who you're paying and the dates they're being paid for.
Employee Pays – confirm pay amounts or make changes or additions, like leave or adjusted hours.
Process Payments – make payments to your employees.
Pay Slips – email or print your employees' pay slips.
A pay run in detail
Here's all the ins-and-outs of doing a pay run. Start a new pay run via the Payroll command centre > Process Payroll.
1. Pay Period
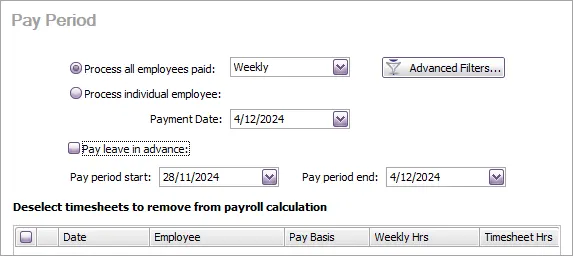
At the Pay Period step, choose who you're paying:
To pay all employees at a set frequency, select Process all employees paid and choose the frequency (Weekly, Fortnightly, Monthly, etc.). If the pay isn't part of a typical pay frequency, like a one-off bonus, choose Bonus/Commission. More about unscheduled pays.
To choose specific employees to pay, click Advanced Filters and set the required filters. For example, you might want to pay only employees with an Employment Status of Casual or Full Time.To pay one employee, select Process individual employee and choose the employee.
Confirm the Payment Date.
This is the date you'll make the payments to your employees, and the payment date that shows on pay slips.
This date determines the financial year the pay falls into, regardless of the pay period. For example, if the payment date is June 30 the entire pay falls into the June financial year.
If you enter a future date, the pay will be recorded in AccountRight on the day you complete the pay run. If you pay employees using a bank (ABA) file, it's the date you want your bank to process the payments.
If you enter a past date, you'll need to choose how to report the pay for STP.
If you're paying an employee leave in advance, select the option Pay leave in advance.
Paying leave in advance
Only select this option if all employees you're paying are being paid leave in advance. This means you can process a separate pay run for each employee being paid leave in advance, or process a pay run for all employees and, in the next step of the pay run, deselect those employees not being paid leave in advance.
Select the Pay leave in advance option.
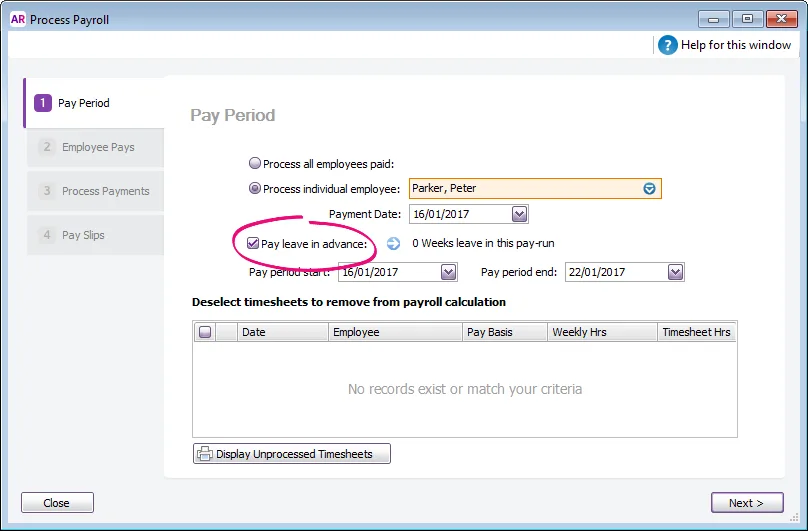
If you are paying leave in addition to your employee’s standard pay, type 1 in the [...] of standard pay field. If you are paying leave in advance only, type 0.
In the [...] of leave in advance field, type the number of pay periods you are processing in advance.
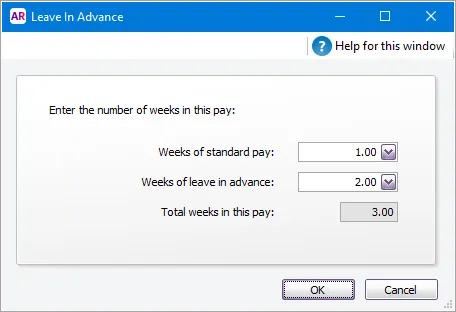
Click OK. The Pay Period window reappears.
When you include multiple pay periods in the one pay run, employee pay details are adjusted accordingly. This includes the calculation of entitlements, superannuation and PAYG withholding amounts.
Confirm the Pay period start and Pay period end dates. This is the period you're paying the employees for.
If any timesheets have been recorded for days within this pay period, they'll be listed and selected for inclusion in this pay.
Working with timesheets
Timesheets, including those submitted by employees via the MYOB Team mobile app, will only be listed if the timesheet dates fall within the pay period dates for this pay run.
Listed timesheets are selected to be included in the pay period.
If you want to...
You need to...
Exclude a timesheet
click in the select column to deselect it in the list.
Change the timesheet details of an employee
click the zoom arrow next to the employee’s name and make the required changes in the Enter Timesheets window.
View the details of unprocessed timesheets
click Display Unprocessed Timesheets.
Why are timesheet hours not included when processing payroll?
If your timesheet hours are not appearing when you process payroll this can be caused by the following.
The pay period dates when processing payroll don't match the timesheet dates, so check the dates you're entering when doing the pay run. If you've already recorded the pay, find out how to change or delete the pay.
Part or all of the timesheet has been included in a previous pay run. To check this, open the current timesheet and check if any of the days are uneditable (greyed out). If they are, it means those days have already been paid.
Why are more hours showing on my pays than are on my timesheet?
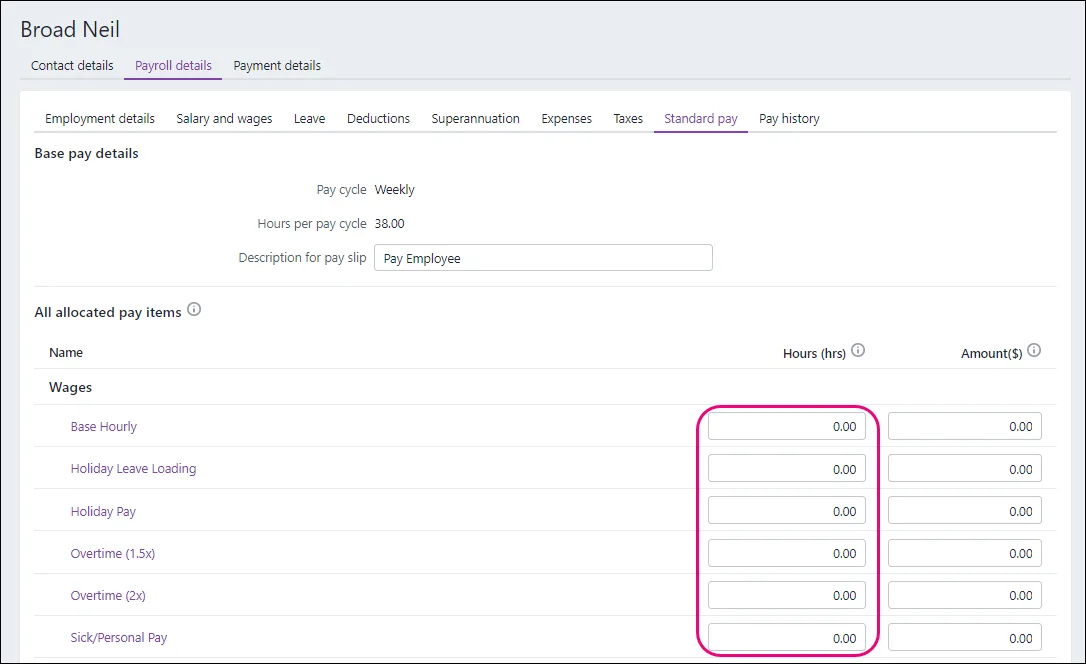
Most likely this is due to hours being entered in the employee's standard pay. The quantity of hours shown on a pay take into account hours entered in the timesheet as well as hours entered in the standard pay.
If you only want to use timesheets to enter the hours an employee worked, zero out any hours from the standard pay in the Payroll details > Standard pay tab of the employee.
When you're done, click Next.
2. Employee pays
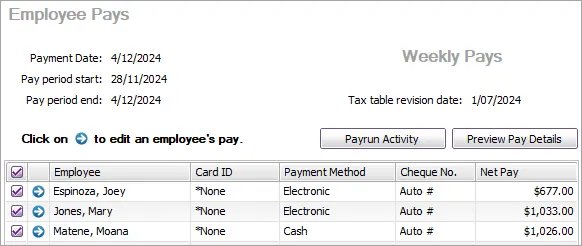
At the Employee Pays step, you'll see the employees you're paying. If someone is missing, make sure the employee's pay frequency matches the one chosen at the previous step, e.g. Weekly. Check an employee's pay frequency in their card (Card File > Cards List > Employee tab > click the employee > Payroll Details tab > Salary and Wages tab > Pay cycle).
To download a summary of the pays:
-
Click Payrun Activity to display the Payrun Activity (Detailed) report. This report shows a summary of all payroll category amounts for the selected employees.
-
Click Preview Pay Details to display the Payroll Verification report. This report shows a breakdown of each selected employee's pay.
Deselect any employees you don't want to include in this pay.
Click the blue zoom arrow for an employee to see the details of their pay or make any changes.
Changing hours worked
You may need to change the standard hours worked by an employee if they are not being paid for a full standard pay period, for instance, if they're a casual worker or have only worked a portion of their usual hours.
If you edit an employee’s hours in the Pay Employee window, any adjustments you make will not update hours entered on timesheets, timesheet reports or, if you record time-billing activities, activity slips.
In the Employee Pays window, click the zoom arrow next to the employee’s name. The Pay Employee window appears.
Change the hours worked for the applicable wage categories and press Tab. The payroll category amounts are calculated automatically and displayed in the Amount column.
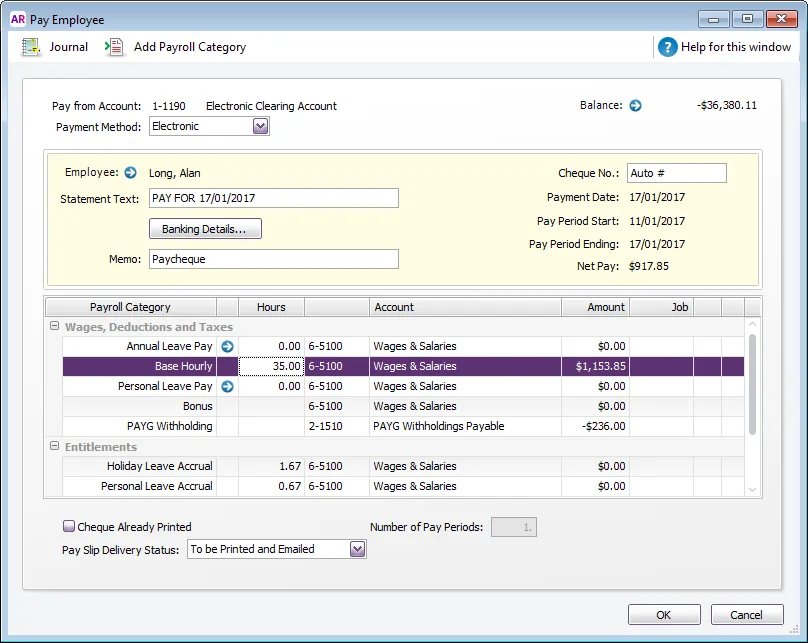
Click OK. The Employee Pays window reappears.
Repeat for each employee whose hours you want to change.
Adding leave
If you've entered annual leave and personal leave hours on a timesheet, you don’t need to follow this procedure.
In the Employee Pays window, click the zoom arrow next to the employee’s name. The Pay Employee window appears.
If you have set up this wage category to automatically adjust the employee’s base pay details, the amount for this wage category is calculated and the Base Hourly (or Base Salary) wage category amounts are adjusted.
If you want the base pay details to be automatically adjusted, you need to select the Automatically Adjust Base Hourly or Base Salary Details option in the Wages Information window for the annual leave or personal leave payroll category you are entering.
If you have not set up this wage category to automatically adjust the employee’s base pay details, reduce the number of hours allocated to the Base Hourly wage category or the amount allocated to the Base Salary wage category by the amount entered for the annual leave or personal leave payroll category.
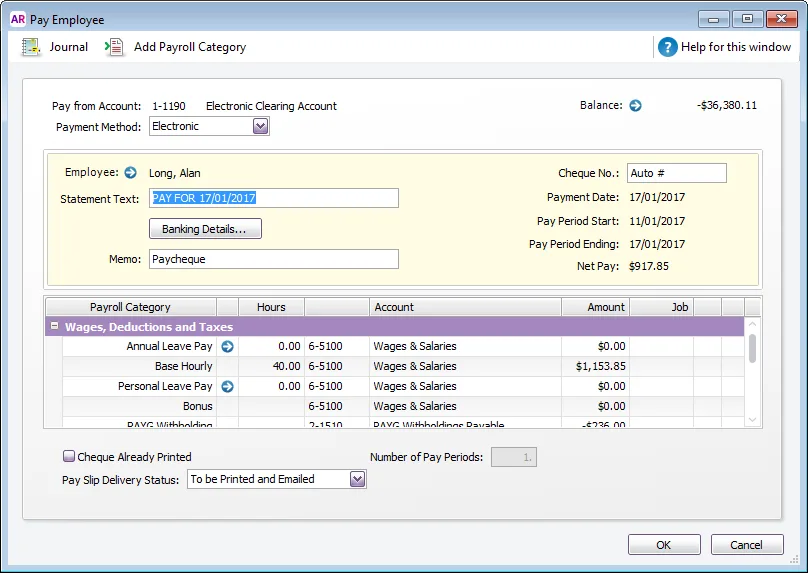
Type the number of personal leave or annual leave hours in the Hours column for the appropriate wage category and press Tab.
If you have set up this wage category to automatically adjust the employee’s base pay details, the amount for this wage category is calculated and the Base Hourly (or Base Salary) wage category amounts are adjusted.
If you want the base pay details to be automatically adjusted, you need to select the Automatically Adjust Base Hourly or Base Salary Details option in the Wages Information window for the annual leave or personal leave payroll category you are entering.
If you have not set up this wage category to automatically adjust the employee’s base pay details, reduce the number of hours allocated to the Base Hourly wage category or the amount allocated to the Base Salary wage category by the amount entered for the annual leave or personal leave payroll category.
If you want to record the details of the leave taken, click the zoom arrow next to the leave category and enter the details in the Leave Tracking Information window that appears.
Click OK. The Employee Pays window reappears.
When you record the transaction, the hours you entered will be subtracted from the number of entitlement hours the employee has accrued.
Including other payments like overtime, allowances or deductions
Include additional payment types like overtime, allowances or deductions during the pay run. If the additional payment is the same amount each pay, automate the payment by adding it to the employee's standard pay.
If other types of payments have been included on a timesheet, you don't need to use this procedure.
In the Employee Pays window, click the zoom arrow next to the employee’s name. The Pay Employee window appears.
In the Hours or Amount fields next to each appropriate wage category, like overtime, type the hours or amounts you want to record.

If the payroll category you want to record hours or amounts against isn't listed, click Add Payroll Category to add it to this pay run.
Click OK to close the employee's pay.
The same approach can be used if a regular allowance or deduction isn't required for a pay. Just change the allowance or deduction Amount to zero.
Assigning jobs to pay amounts
Job numbers can be assigned to payroll category amounts to track the wage expense of work performed. You can assign one or more jobs to each payroll category.
In the Employee Pays window, click the zoom arrow next to the employee’s name. The Pay Employee window appears.

Type or select the job number in the Job column corresponding to the payroll category.
If you want to assign multiple jobs to a payroll category:
Click in the Job column corresponding to the appropriate payroll category and then click the search icon ( ). The Allocate Jobs window appears.
Click in the select column next to each applicable job and type the amount in the Amount column.
Click OK. The Pay Employee window reappears.
Click OK. The Employee Pays window reappears.
You can also assign a default job to an employee in the Standard Pay section of the employee’s card.
Adding a message to the pay slip
You can enter a default pay slip message (memo) in an employee's standard pay that'll appear on all pay slips for that employee. But you can update this message or enter a new one during the pay run, and it'll only appear on the pay slip for this pay.
At the Employee Pays step of the pay run, click the blue zoom arrow to expand the employee's pay.
Enter or update the Memo.

Click OK to continue the pay run.
When you're ready, click Record.
At the confirmation, click Record again.
When prompted to send payroll information to the ATO (for Single Touch Payroll reporting), enter the name of the authorised sender and click Send.
3. Process Payments
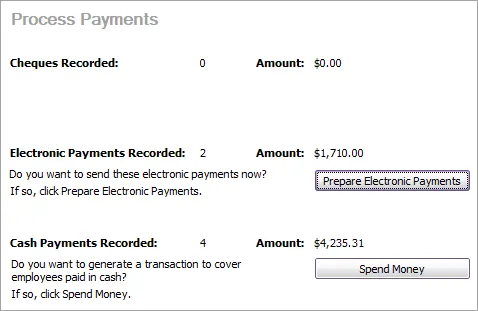
At the Process Payments step, you can disburse your employees' payments electronically or by cash or cheque. Each employee's payment method is set in their card (Card File > Cards List > Employee tab > click to open the employee's card > Payment Details tab > Payment Method).
Paying employees electronically (into their bank accounts)
Providing you have set up electronic payments, you can create a bank file containing your employee's payments, then upload it to your bank for processing.
Click Prepare Electronic Payments to open the Prepare Electronic Payments window.
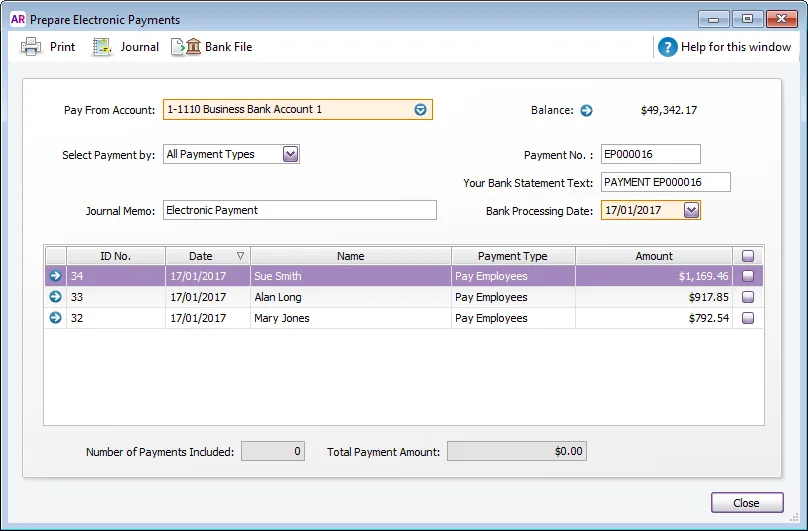
In the Pay From Account field, select the bank account from which you make electronic payments. Need to change this account? See Setting up electronic payments for bank files.
Select Pay Employees from the Select Payment By list, if it is not already selected.
In the Bank Processing Date field, type the date you want the bank to process the pays. Unprocessed pays up to and including this date appear.
[Optional] Record the purpose of the transaction in the Journal Memo field.
Click in the select column next to the payments you want to include in the electronic payment.
Click Bank File. A message appears stating that the transaction will be recorded before the bank file is created.
Click OK. The Save As window appears.
Preparing multiple electronic payment files
When you save the electronic payment file, it is given a default name and is formatted as an .ABA file. If you prepare multiple electronic payment files, you should rename each file (keeping the .ABA file extension), so that you do not overwrite an unprocessed file.
Choose where you want to save the electronic payment file and click Save. The Prepare Electronic Payments window reappears.
Click Close. The Process Payroll window reappears.
When you're ready, you can upload the bank file to your bank for processing using your bank's online banking portal. Refer to the help in your online banking for instructions on how to do this, or check with your bank. You can also search Google for your bank's instructions, e.g. search for "upload bank file ANZ" or "upload aba file westpac", etc.
Paying employees by cash
If you pay employees by cash, you'll need to record those cash payments as a Spend Money transaction in AccountRight.
Click Spend Money to open the Spend Money window. You'll see the details of total cash wages paid and the default clearing account you use for cash wages.
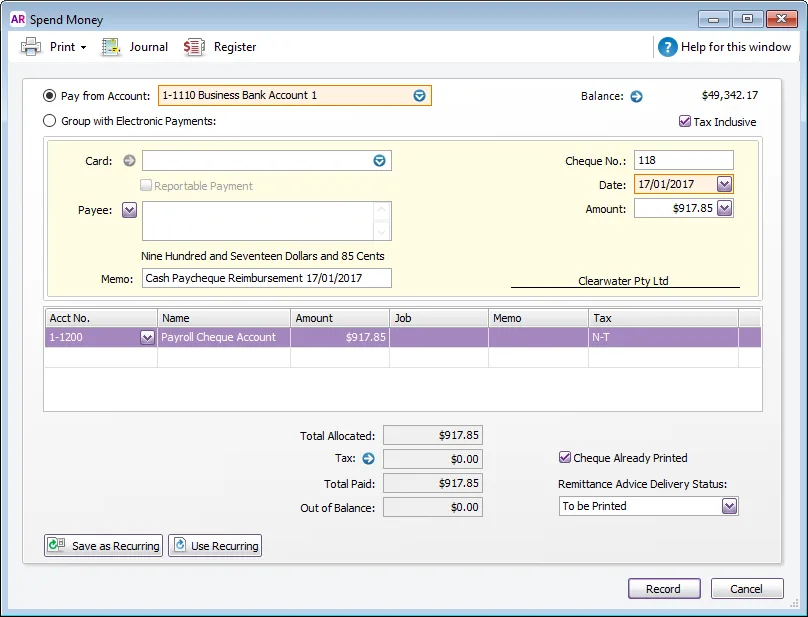
In the Pay from Account field, select the bank account from which you withdrew the cash wage amount.
Click Record. The Process Payments window reappears.
Paying employees by cheque
If you pay employees by cheque, you can print their paycheques
Click Print Paycheques to open the Review Cheques Before Printing window.
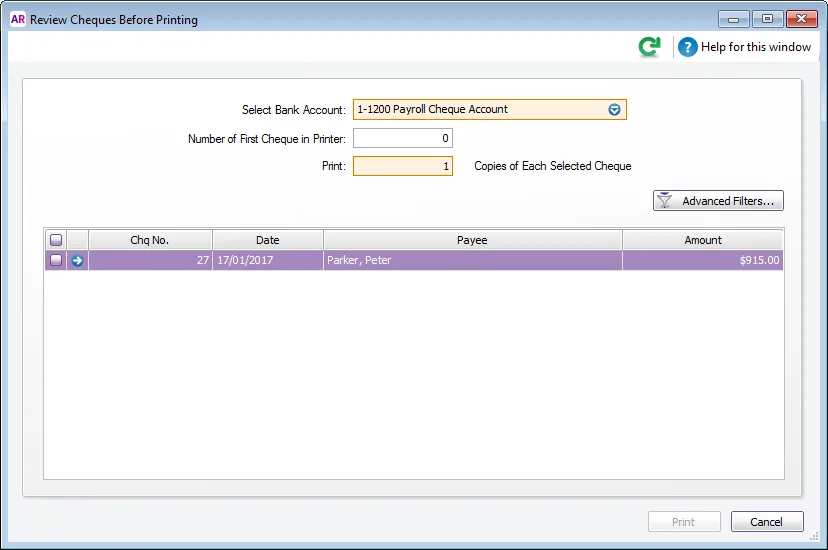
If you use customised forms that have pre-printed cheque numbers, type the first cheque in the Number of First Cheque in Printer field.
Type how many copies you want to print in the Print [...] Copies of Each Selected Cheque field.
If you want to filter the employee list or change the customised form it will be printed on, click Advanced Filters. For more information, see Advanced batch filters.
Click in the select column next to the paycheques to be printed.
If you want, click the zoom arrow to view more information about a particular pay.
Click Print. The Process Payroll window reappears.
When you're done, click Next.
4. Pay Slips
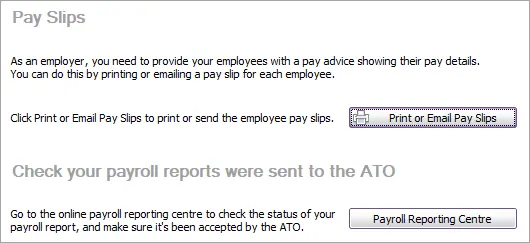
At the Pay Slips step, click Print or Email Pay Slips to generate pay slips for your employees. The pay slips will be listed on the To Be Printed or To Be Emailed tab based on each employee's default delivery method (Card File > Cards List > Employee tab > open the employee's card > Payroll Details tab > Personal Details tab > Pay Slip Delivery).
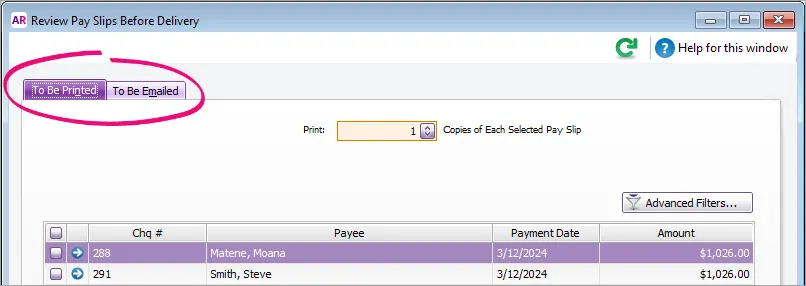
Printing or emailing pay slips
At the Pay Slips step of the pay run, click Print or Email Pay Slips.
Click the To Be Printed or To Be Emailed tab (depending on what you want to do).
Select the employees you're printing or emailing pay slips for.
If you're printing pay slips:
Type the number of copies you want to print in the Print field.
Select the pay slips you want to print.
Click Print. The pay slips will be sent to your printer.
If you're emailing pay slips:
Select the pay slips you want to email.
If you want to change a recipient’s email address, subject or message (for example to indicate that the pay slip has been re-sent), click to highlight the pay slip and update the email details at the top of the window.
To change the default subject or message to use when emailing pay slips, click the Email Defaults button in the To Be Emailed tab. Learn more about default email settings.
(Optional) To email a pay slip to multiple email addresses, enter the addresses in the Email Address field, separated by semi-colons (;).
Click Send Email. The pay slips will be emailed as PDF attachments. If you send emails using AccountRight's built-in email feature, you'll be able to track if the email's been delivered.
At the Pay Slips step, you can also click Payroll Reporting Centre to view your STP reports.
Managing payroll, reporting and super
Here are some other key tasks to help manage your payroll.
Check your STP reports
Make sure the ATO accept the reports you send them after each pay. View STP reports
Make super payments
Send payments to your employees' super funds at least quarterly. Make super payments
Adjust a pay
You can fix most pay issues in the next pay run or a separate pay. Fix a pay
Review payroll reports
All your payroll info at a glance, including paid and accrued leave and super. Review payroll reports